Configuring Simulator
In this page, we are going to demonstrate how to setup a simulator on OACIS.
In order to execute an existing simulator from OACIS, the simulator must be prepared to conform to the requirements by OACIS. For example, OACIS gives input parameters to simulators by command-line arguments or JSON. You must prepare a small script in order to adjust the interface of input parameters. In this page, how to prepare a simulator as well as a few samples are demonstrated.
- Configuring Simulator
Job Execution Sequence
First, the job execution sequence are explained in detail.
When you register a simulator on OACIS, you save the command line string, not the execution program itself. By this specification, OACIS can run various programs written in any programming language. It also means that the simulation program must be compiled on computational hosts before submitting a job. OACIS generates a shell script including the command line to execute the program. We call this script “job script”. For each run, one job script is created. Job scripts created by OACIS are submitted to the job schedulers (such as Torque) on computational hosts via SSH. Just before submitting job scripts, a temporary directory is created for each job. We call it “work directory”. Jobs are executed in their work directories. Work directories are created under the “work base dir” directory which was specified when registering a computational host.
Here is the summary of the job sequence.
OACIS-server                                  |     computational host              |   computation node
----------------------------------------------|-------------------------------------|---------------------------------------
                                           ---|-->  SSH login                       |
                                              |     create a work directory         |
                                              |     prepare _input.json             |
                                              |     create a job script             |
execute local preprocess                      |                                     |
                                              |     copy output of local preprocess |
                                              |     execute preprocess              |
                                              |     submit job script               |
                                              |                                     |   (when job script start)
                                              |                                     |   execute print-version command
                                              |                                     |   save execution logs to a file
                                              |                                     |   execution of the simulation program
                                              |                                     |   compress the work directory
                                              |                                     |
                                              |     (after the job finished)        |
                                           ---|-->  SSH login                       |
                                              |     download the compressed results |
extract the results                           |                                     |
move the output files to specified directory  |                                     |
parse logs and save them in MongoDB           |                                     |
First, OACIS login to the computational host and create a work directory for the job.
Then, put _input.json file if the simulator’s input format is JSON. This file contains the input parameters for the job.
You can define a process which is executed before submitting a job. We call it “pre-process”.
This is useful when you prepare the necessary files before conducting simulations. For example, you can use pre-process to copy some configuration files to the current directory.
We can define two types of pre-process: “local pre-process” which is executed in OACIS server and “pre-process” which is executed on the computational host.
Pre-processes are executed after _input.json was created. The details of pre-process are also shown later.
Then, the job is submitted to a job scheduler. After the job is submitted to the scheduler, the scheduler handles the job queue.
When a job script is executed, it records various logs to files in addition to the simulation execution. For example, execution date, executed host, and elapsed time are recorded. To record this information, shell commands like date, hostname, and time are used.
These logs are stored in _status.json file. This file is parsed when jobs are included into OACIS database.
As we will explain later, OACIS can record the version information of the simulators. When you register a simulator, you can set “print-version command”, which is a command to print the version information of the simulator.
If the print version command is defined, the command is embedded in the shell script. The command is executed just before executing the simulation to record the current version of the simulator. This information is saved in the file _version.txt and parsed by OACIS when the job is included.
After the simulation finished, the work directory is compressed into a single file. By compressing the result, we can reduce the time to download the file.
Requirements for simulators
To execute a simulator from OACIS, simulators must satisfy the following requirements.
- The output files or directories must be created in the current directory.
- OACIS creates a work directory for each job and executes the job in that directory. All the files and directories in the work directory are stored in OACIS as the simulation outputs.
- Simulator must receive input parameters as either command line arguments or JSON file. You can choose one of these when registering the simulator on OACIS.
- If you choose the former one as a way to set input parameters, the parameters are given as the command line arguments in the defined sequence with a trailing random number seed.
- For example, if an input parameter is “param1=100, param2=3.0, random number seed=12345”, the following command is embedded in the shell script.
~/path/to/simulator.out 100 3.0 12345
- For example, if an input parameter is “param1=100, param2=3.0, random number seed=12345”, the following command is embedded in the shell script.
- If you choose JSON format as a way to set input parameters, a JSON file named _input.json is prepared in the temporary directory before execution of the jobs. Simulator must be implemented such that it reads the json file in the current directory.
{"param1":100,"param2":3.0,"_seed":12345}- Random number seed is specified by the key “_seed”.
- The command is executed without command line argument as follows.
~/path/to/simulator.out
- If you choose the former one as a way to set input parameters, the parameters are given as the command line arguments in the defined sequence with a trailing random number seed.
- The simulator must work even with the files listed below in the current directory. These files must not be overwritten.
- _input.json , _output.json , _status.json , _time.txt, _version.txt
- These files are used by OACIS in order to record the information of the job. Avoid conflicts with these files.
- The simulator must return 0 when finished successfully. The return code must be non-zero when an error occurs during the simulation.
- OACIS judges if the job finished successfully or not based on the return code.
Sample scripts for configuring simulators
As we mentioned in the previous section, the program must receive input parameters either from command-line arguments or from JSON. Probably most of your simulation programs do not conform to the format of input parameters. In order to implement your simulators, you need to prepare a script that wraps your simulation program in order to adjust the I/O format. Let us call the script “wrap script” from now on. It is easier to prepare a wrap script using a light-weight scripting language such as a shell script, Python, or Ruby. After you have prepared a wrap script, register the path to the wrap script as the simulation command in OACIS. OACIS executes the wrap script, which in turn executes the actual simulation program.
We are going to show a few samples for wrap scripts.
Example 1: changing the command line argument
Suppose you have a simulation program which has four input parameters. You can set these input parametes by command line options. Let us assume that the options to set parameters are “-l”, “-v”, “-t”, “–tmax”. In addition to these, we can set the seed of random number generator by the “–seed” option. A command for this simulator would look like
~/my_proj/my_simulator.out -l 8 -v 0.25 -t 1234 --tmax 2000 --seed 1234
You can not run this program directly since the format of the command line is different from the one given by OACIS.
To adjust the input format, we prepare a shell script wrapper.sh as follows:
#!/bin/bash

set -e
script_dir=$(cd $(dirname $BASH_SOURCE); pwd)
$script_dir/my_simulator.out -l $1 -v $2 -t $3 --tmax $4 --seed $5
Put this shell script in the directory where the simulation program exists. By running this wrap script from OACIS, you can execute the simulation program with the input parameters given by OACIS.
The tips for this script are
- Put
set -ewithin the script, which makes the return code ofwrapper.shto a non zero value when the simulation program returns non-zero code.- OACIS checks the return code of
wrapper.shto judge if the job finished successfully or not. Withoutset -e, you always get a return code 0 even if the actual simulation program fails, which results in a misjudgement of the job status.
- OACIS checks the return code of
- When you execute the actual simulation program (
my_simulator.out), you need to specify the absolute path of the executable.- Since OACIS executes a job from its work directory, the path of the executable must be written in the absolute path.
Example 2. writing parameters to a configuration file
Let us consider another example. Consider the case that your simulator reads input parameters from an XML configuration file.
Here we assume that the simulator reads its input parameters (say “length”, “velocity”, “time”) and one random number seed from the XML file. You specify the XML input file as an argument of the execution command.
For example, a configuration XML might be as following.
<configuration>
    <input>
        <length value="8" />
        <velocity value="25.0"/>
        <time value="2000"/>
        <seed value="1234"/>
    </input>
</configuration>
To run the program with this XML, specify the path to the XML file as a command line option as follows.
~/my_proj/my_simulator.out -c configuration.xml
In order to execute this simulator from OACIS, we prepare a wrap script wrapper.py written in Python.
When registering this simulator on OACIS, let us set Input type to “JSON” because reading a JSON file from a python script is easier than reading command line arguments.
We assume that wrapper.py is located in the same directory as the execution program my_simulator.out.
The script wrapper.py looks the following.
import os, sys, json, subprocess

# Load JSON file
fp = open( '_input.json' )
params = json.load( fp )

# Prepare input file
f = open('configuration.xml', 'w')
param_txt = """<configuration>
    <input>
        <length value="%d" />
        <velocity value="%f"/>
        <time value="%d"/>
        <seed value="%d"/>
    </input>
</configuration>
""" % (params['length'], params['velocity'], params['time'], params['_seed'])
f.write(param_txt)
f.flush()

# Execution of the simulator
simulator = os.path.abspath(os.path.dirname(__file__)) + "/my_simulator.out"
cmd = [simulator, '-c', 'configuration.xml']
sys.stderr.write("Running: %s\n" % cmd)
subprocess.check_call(cmd)
sys.stderr.write("Successfully finished\n")
The sequence of the Python script
- read the JSON file (“_input.json”) having input parameters
- This JSON file is prepared by OACIS
- generate a file
configuration.xml- (TIPs) Do not forget to call
flush()to ensure that the file has completely written to the disk before executing the simulator
- (TIPs) Do not forget to call
- execute
my_simulator.outmy_simulator.outexists in the same directory aswrapper.py. Use__file__to get the absolute path to thewrapper.py.- As we have seen in Example 1, we need the absolute path to
my_simulator.out.
- As we have seen in Example 1, we need the absolute path to
- check the return code of
my_simulator.out. If it is not zero, throw an exception.- OACIS judges the status of the job based on the return code of
wrapper.py. Therefore, ifmy_simulator.outreturns a non-zero return code,wrapper.pyshould return a non-zero return code as well. - In Python,
subprocess.check_callmethod throws an exception when the external process returns a non-zero return code.
- OACIS judges the status of the job based on the return code of
Setting Items of Simulators
The following is the list of items we set when registering a simulator.
| field | explanation |
|---|---|
| Name * | Name of the simulator. Only alphanumeric characters and underscore (‘_’) are available. Must be unique. |
| Definition of Parameters * | Definition of input parameters. Specify name, type(Integer, Float, String, Object), default value, and explanation for each input parameter. |
| Local Preprocess Script | Script executed at OACIS server before the job. If this is empty, no pre-process is executed. |
| Preprocess Script | Script executed at the computational host before the job. If this is empty, no pre-process is executed. |
| Command * | The command to execute the simulator. It is better to specify by the absolute path or the relative path from the home directory. (Ex. ~/path/to/simulator.out) |
| Print version command | The command to print the simulator version information to standard output. (Ex. ~/path/to/simulator.out –version) |
| Input type | How the input parameter is given to the simulator. Select either “Argument” or “JSON”. |
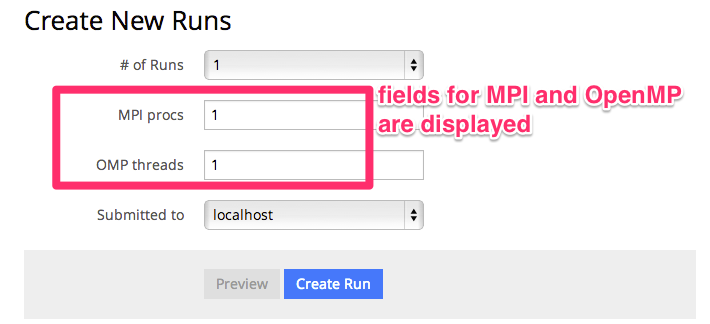
| Support mpi | Whether the simulator is an MPI parallel program or not. If you enable this option, you can specify the number of MPI processes when making a Run. |
| Support omp | Whether the simulator is an OpenMP parallel program or not. If you enable this option, you can specify the number of OpenMP threads when making a Run. |
| Sequential seed | Whether the random number seed is given randomly or in a sequential order for each ParameterSet. |
| Description | An explanation of the simulator. You can refer to the explanation from OACIS web UI. Markdown format is available. |
| Executable_on * | Specify the hosts on which the simulator can be executed. You can select one of these as the computational host when making a Run. |
Required fields are indicated by (*).
When you enter Definition of Parameters fields, make sure that the specified type and the default value are consistent with each other. For example, if you specify a string value as a default value of an integer field, you get an error and are required to fix the inconsistency.
New in v3.8.0 Object is available as a parameter type since OACIS v3.8.0. You can specify a free-format object in JSON.
When you specify Local Preprocess Script and/or Preprocess Script, you can define a pre-process which is executed just before the job execution. It is useful for preparing input files for simulators or doing some processes which is executable only on job submission nodes. Please refer to [Defining pre-process] (#preprocess) for details.
Command is the command to execute the simulation program. This string is embedded in the shell script, which is submitted to a job scheduler of a computational host. Since each job is executed in a work directory, the command must be specified by a full path. In order to make the command executable on various hosts, we recommend to use the relative path from the home directory. (Example: ~/path/to/simulator.out)
If you set Print version command, simulator version information is recorded for each run. This command is also embedded in the job script, and will be executed just before executing the simulation program. The standard output of this command is used as the version information. If you record the version information, you can delete or replace Runs which are executed with an appropriate version at once. Please refer to Recording simulator version for details.
Input type specifies how the input parameters are given to the simulator. You can select either “Argument” or “JSON”.
When you select “Argument”, the input parameters are given as command line arguments of the command.
When you select “JSON”, the input parameters are written in a JSON file _input.json.
[Advanced] MPI, OpenMP jobs
If you enable the checks of Support MPI or Support OMP when registering a simulator, you can specify the number of process or threads when making a Run. The fields to specify these numbers will appear.
If you enable the OpenMP option, the environment variable OMP_NUM_THREADS is defined in the job script. The number of threads specified when making the Run is set to this variable. Hence, your simulator must refer to the OMP_NUM_THREADS environment variable to determine the number of threads. (If your program explicitly specifies the number of threads using the omp_set_num_threads() function, the environment variable will be ignored.)
If you enable the MPI option, the number of processes you specified when making a Run is set to the OACIS_MPI_PROCS environment variable.
For the Command field of the simulator, the mpiexec command which refers to this environment variable must be specified.
The following is an example of such commands.
mpiexec -n $OACIS_MPI_PROCS ~/path/to/simulator.out
[Advanced] Defining a pre-process
Some simulation programs require a pre-process before doing an actual simulation. For example, a simulator may require preparation of an input file or may require the copy of some libraries to a proper directory. However, it is ocassionally impossible to do such a pre-process in a job script.
For example, in some HPC environments, some scripting language such as Ruby or Python is not installed on the computational node. They are sometimes installed only on login nodes hence users must use the script language in the login nodes. In such cases, a pre-process must be executed on the login nodes if your pre-process is written in a scripting language.
To avoid such issues, OACIS provides a way to define a pre-process for each simulator. This pre-process is executed on the OACIS server (called “local pre-process”, available since v2.12.0) and/or the login node of the remote host (called “pre-process”) before submitting the job. Therefore, you can avoid the problem described above.
The detailed execution sequence of “local pre-process” is as follows.
- Make a directory for each Run at OACIS server.
- If Simulator’s input type is “JSON”, write
_input.jsonfile in the work directory. - Make a file
_lpreprocess.shin this directory. The shell script contains the commands defined in local_pre_process_script. - Change the current directory to the directory and execute
_lpreprocess.sh.- If the simulator’s input type is “Argument”, input parameters are given to
_lpreprocess.sh. - Standard output and standard error are printed to _stdout.txt and _stderr.txt files, respectively.
- If the simulator’s input type is “Argument”, input parameters are given to
- If the return code of _lpreprocess.sh is not zero, cancel the job submission and set the status of Run to failed.
- If the local pre-process suceeded, the files created in the current directory are copied to the work directory of the remote host.
The detailed execution sequence of “pre-processes” is as follows.
- Make a work directory for each Run.
- If Simulator’s input type is “JSON”, write
_input.jsonfile in the work directory. - Make a file
_preprocess.shin the work directory. The shell script contains the commands defined in pre_process_script. - Change the current directory to the work directory and execute
_preprocess.sh.- If the simulator’s input type is “Argument”, input parameters are given to
_preprocess.sh. - Standard output and standard error are printed to _stdout.txt and _stderr.txt files, respectively.
- If the simulator’s input type is “Argument”, input parameters are given to
- If the return code of _preprocess.sh is not zero, cancel the job submission and set the status of Run to failed.
- When a pre-process failed, copy the contents of the work directory to OACIS server so that users can see the output files.
After these pre-processes finished, the job script for the Run is submitted to the scheduler.
Note that the above sequences are executed when “local_pre_process_script” and/or “pre_process_script” of Simulator are not empty.
Displaying results in browser
Although the simulator’s output files are stored in the file system by default, you may save some scalar value results in DB. You can instantly plot the values saved in the DB using the web browser interface, which helps you quickly see the parameter dependence of the result values. For example, you may wish to save the average or variance of some time series data.
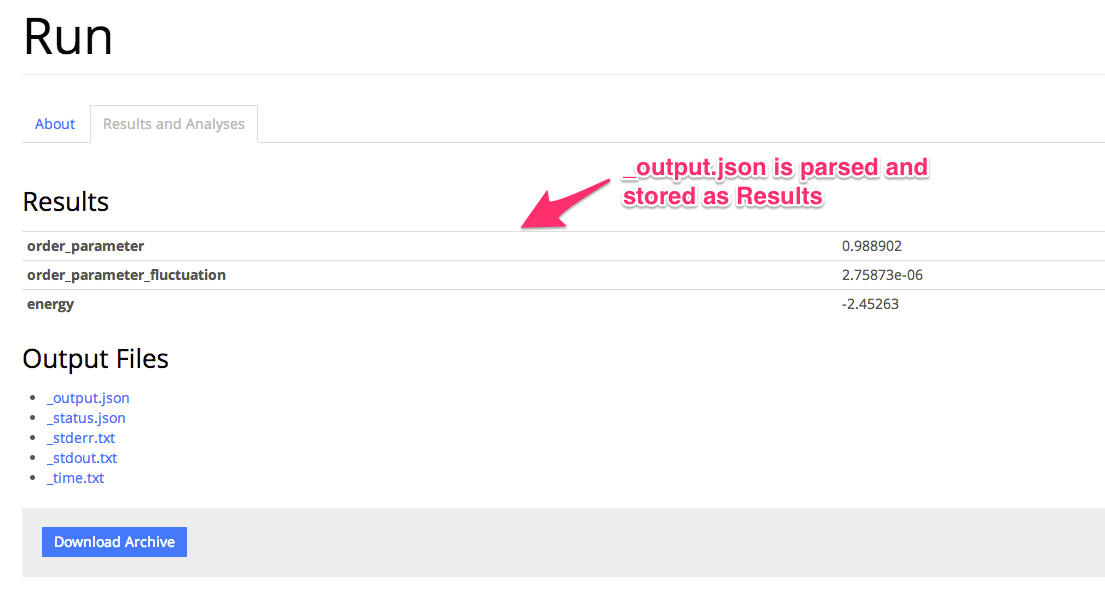
To save the values in DB, you just need to save the values to _output.json file in JSON format. If your simulator writes _output.json file in the work directory, it is parsed and the contents are saved in the DB when OACIS includes the job result. In case your simulator does not write a JSON file, you can convert the output format in your wrap script.
For example, you can save the output as follows.
{
  "average": 0.25,
  "variance": 0.02,
  "hash_value": {"a": 0.7, "b": 0.4}
}
(Warning) Because of the limitation of MongoDB, you can not use a key including “.”.
You can see the stored values from the pages of Runs.
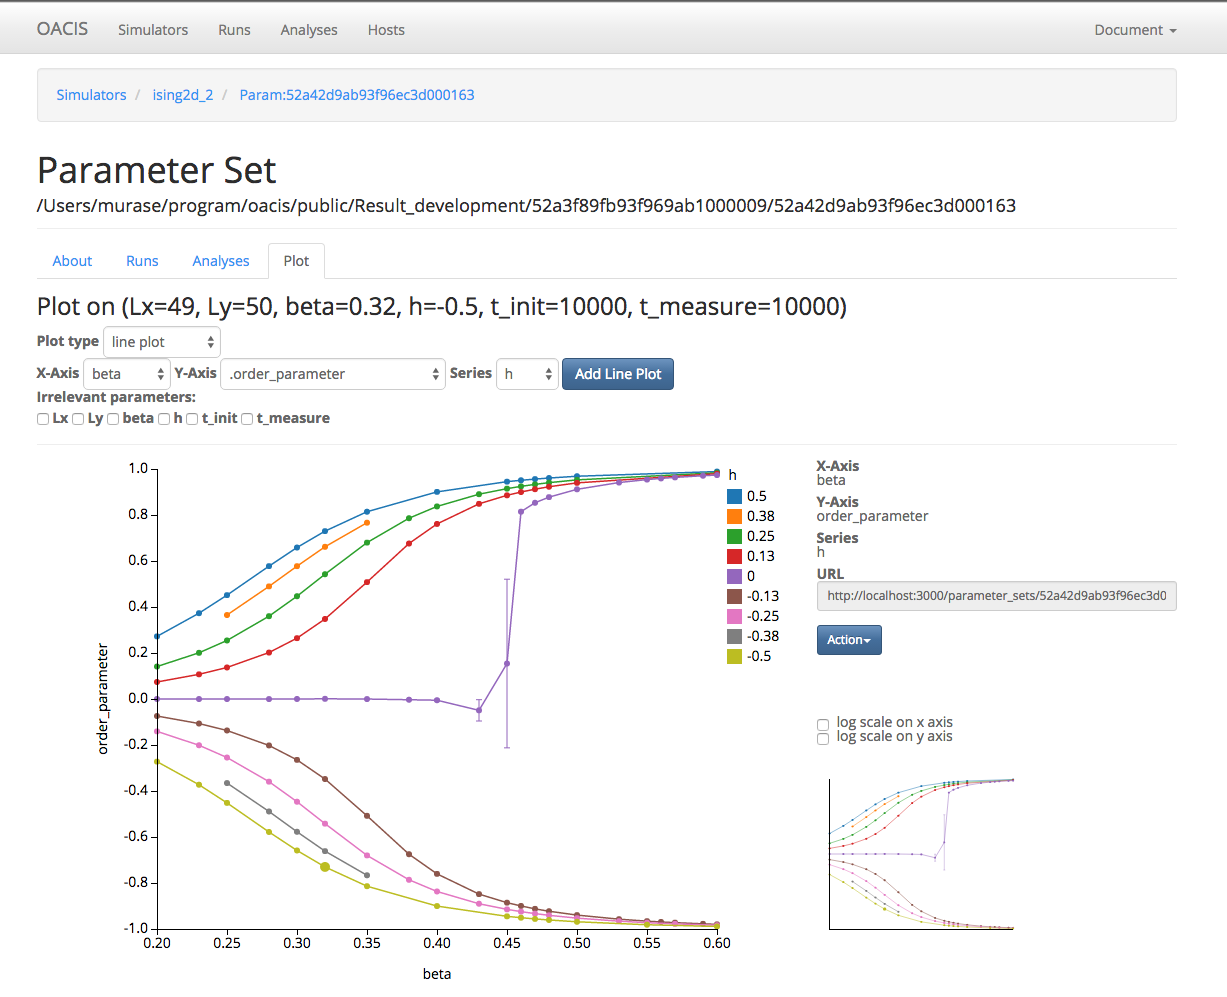
If you click a “Plot” tab from the page of ParameterSet, you will see the page to display plots.
Select the type of plot, x-axis and y-axis. OACIS will collect the relevant ParameterSets and plot the average for each ParameterSet. If you drag a mini plot displayed in the right bottom region, you can magnify the plot. You can also switch scale (log or normal) of the axis. If you double click the data points, the page for the corresponding ParameterSet are opened. Each url has a unique url, with which you can reopen the current plot.
[Advanced] Saving simulator versions
If you configure the “print version command” field of the simulator, you can record the version of the simulator for each job.
This is useful, for example, when you find a bug in your simulator while conducting a series of jobs. Probably, you wish to delete or re-execute the Runs conducted with an inappropriate version of the simulator. If you have recorded the simulator version for each job, you can efficiently find the jobs which must be re-executed by the version information.
To save the version information, we need to save a command to print the version information of the simulator. Suppose that the version information of the simulator is printed by the following command for example.
~/path/to/simulator.out --version
When you register your simulator on OACIS, fill in this command to Print version command field. OACIS will embed this command into job scripts, and the standard output of this command is recorded as the version information in OACIS.
Since the string printed by “Print version command” is recognized as the version information, we can flexibly use this command. For instance, you may use a part of the bulid log as the version information. Or you may wish to save the commit ID of your version control system.
head -n 1 ~/path/to/build_log.txt
cd ~/path/to; git describe --always
You can delete or replace the runs having a specified by version at once using the command line interface (CLI). Please refer to the page for CLI for details.
[Advanced] Viewing GPU Profiling Results
If you are using GPUs with OACIS, the nsight2pyplot provides options to view profiling information. nsight2pyplot is an external tool, so its repo needs to be cloned on the Host. The repo is available at: https://github.com/kodingkoning/nsight2pyplot.
nsight2pyplot generates figues for the timeline of the kernels in the profiled run, and a boxplot of the kernel runtimes. The timeline may look like:

The commands to create and process a profile must be added to the Simulator command. nsys profile is required to create the profile, and then the plot_profile.sh script from nsight2pyplot can be run on the profiling output. The commands for the similar will look like the follow, with the name of the simulator script and the path to nsight2pyplot specified:
nsys profile --stats=true --cuda-memory-usage true SIM_SCRIPT && ~/path/to/nsight2pyplot/plot_profile.sh report1
These commands do assume that the profile will have the prefix of report1, which will be the case if nsys profile is running in the directory created by OACIS.
More information and examples are available in the documentation for nsight2pyplot.